
The hallway molding big finish
Like a lot of folks out there, I’m a great starter but a lousy finisher. Case in point: the hallway molding project I began last winter. Yea … until last night at 10 p.m., it was still not done.
But thanks to the BLACK+DECKER Your Big Finish initiative going on right now, I was pretty much forced to get my tail in gear and get it done yesterday. The funny thing? It only took me one day to do it. I’m constantly amazed at how I will literally stare at something and stress about it for an entire year rather than just do the one day of work it takes to get the project finished. Seriously, I should probably see a therapist.
So this project started, ahem, last February, after we put in the hickory floors. I wanted to add some decorative molding to “class up” the entry hallway. I painted the lower portion of the walls in a semi-gloss white paint that matches our window and door trim. (In hindsight, when I do a project like this again, I’ll switch to Valspar’s soft gloss finish; it’s more forgiving than semi-gloss.)
I topped off the strip of white paint with chair rail molding, painted the same color.

And that is where the work stopped until last week when I accepted the BLACK+DECKER challenge.
I bought a handful of 8-foot strips of “picture frame” molding from my local lumber company. I used my paint sprayer to quickly spray them with two coats of Valspar’s paint and primer in one.

After that, I asked for help from my math genius husband. He figured out where each “box” should go and drew the templates on the walls. Each box was to start five inches in from the nearest edge or piece of molding next to it. I simply used his penciled templates to determine the molding cuts I needed to make on my miter saw. Every piece but the wonky one next to the staircase required a simple, 45-degree angle cut at each corner.
 I attached each piece of molding to the wall using a nail gun loaded with Brad nails.
Finally, I caulked the nail holes and used my paint sprayer to give the walls and molding a professional-looking top coat of the white paint. I taped off everything first.
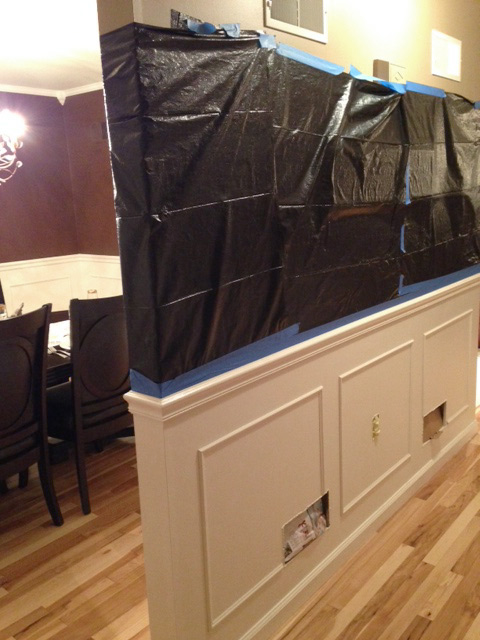
I also taped craft paper to the floor. A few spots of paint overspray still got on the floor. But I quickly scrubbed it off; no permanent harm done.
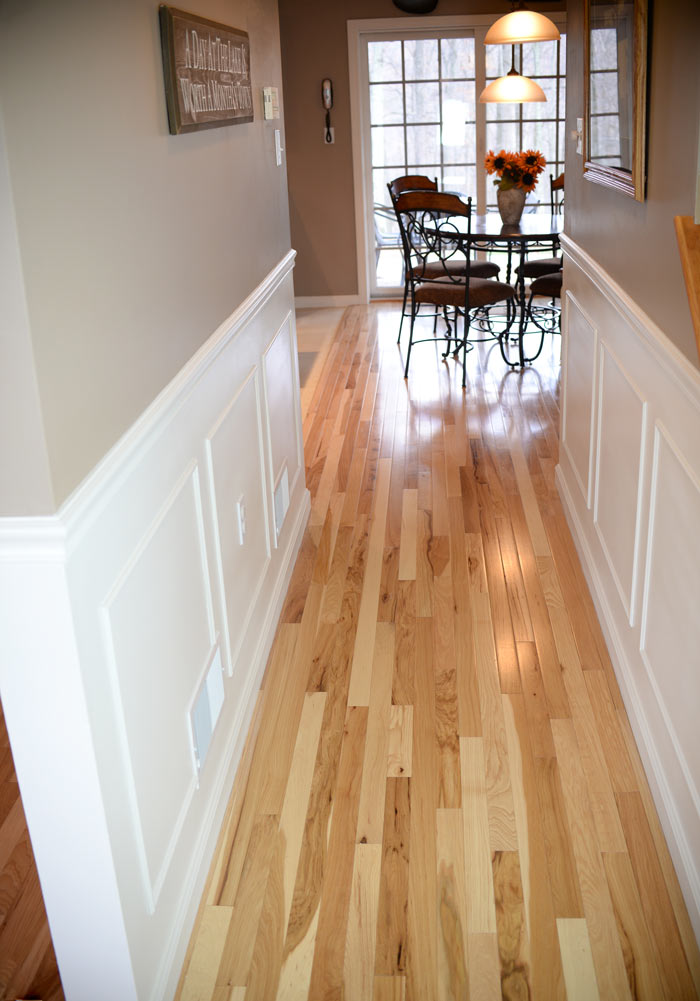
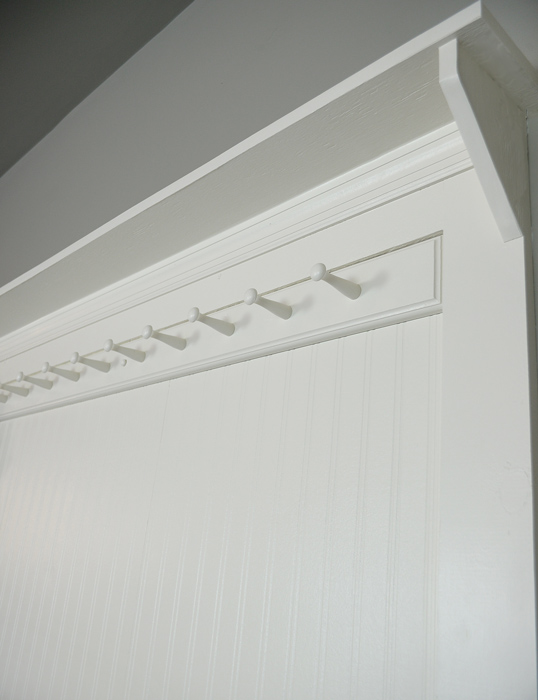
Here’s what my new, finally finished, hallway molding looks like:

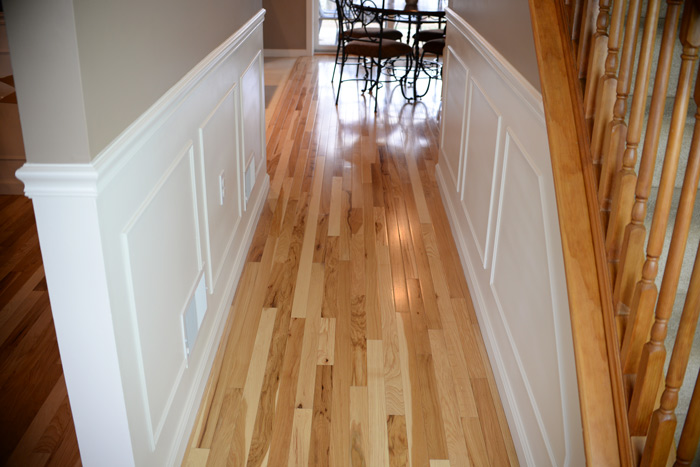

Notice how I had to cut around the air vents.

Here’s the wall before the molding:

And after:
So … what DIY project do you need to finish this holiday season?
BLACK+DECKER has launched a movement to get all your unfinished home projects moving again. You can join them for the opportunity to win $10,000 cash and products. Plus, they might put you and your finished project on a billboard right in the middle of Times Square! (I would seriously make a trip to New York if my project made it on a billboard!) So while our family may never notice that we finished hanging the molding, millions of others will! 🙂
For this campaign, there are weekly prizes, and one grand prize of $10,000.
BLACK+DECKER weekly prize packages are comprised of one of each of the following:
• BDCDE120C 20V MAX* Lithium Drill/Driver with AutoSense™
• BDEMS600 Mouse Sander
• BDCS40BI 4V MAX* Lithium Pivot Screwdriver
• BDCDCMT120 Matrix 20V MAX* Lithium Drill/Driver
• LCS1020 20V MAX* Chainsaw
• BDCMTRS Matrix Reciprocating Saw Attachment
• BDCMTI Matrix Impact Driver Attachment
To enter, visit the campaign landing page, and enter your first name, last initial, email, city, state and phone number. Then upload a photo of yourself and your completed project. Or you could just head over to the landing page and look at the gallery of finished projects to get inspiration.
Please note: The BLACK+DECKER Your Big Finish contest ends Dec. 28.

Special thanks to BLACK+DECKER for sponsoring this post and inspiring me to FINALLY finish this project! As always, all opinions (and sweat equity) are 100 percent mine.


I really love the way that turned out! It looks great. That’s my goal for next year… replacing my chair rail that style Wainscoting.
Thanks for the feedback, Dean. I call this style “poor-man’s wainscoting.” But it does look absolutely amazing in a space and costs a fraction of what true wainscoting would cost. Thanks for stopping by. 🙂
Hi! Love the finished look! Are the bottom portion of your walls wood or Sheetrock? I want to put up some board and batten treatment but I didn’t think nails would hold well in my Sheetrock walls… Thanks!
Just sheetrock … I simply painted over the existing wall paint with the semi-gloss white paint to give it the illusion of wainscoting – I call it “poor man’s wainscoting.” I had no problem with the nails holding. In another room, I actually used Liquid Nails to adhere the molding to the walls, which worked just fine. Thanks for stopping by. 🙂
Great job! Love the top paint color – could you tell me what it is? Thx
Thanks! I assume you mean the tan color? It’s Iced Chocolate CI 60 – Valspar (from Lowe’s).
That looks outstanding! I really need to look into one of those sprayers. Even with all the masking, it looks like it made the task easier and finish better. Great work.
I just love your floors.
Love the new molding, Susan! Those floors are absolutely gorgeous! We have some cheap cherry laminate and I can’t wait to change our floors out. Beautiful job!
Thanks so much, Sarah! 🙂
Looks fantastic!
Thanks, Sharon!