Quick and easy shower gift: DIY plywood art
I recently hosted a baby shower for my middle sis, Megan. We are so excited to meet my new nephew any day now. Eek!
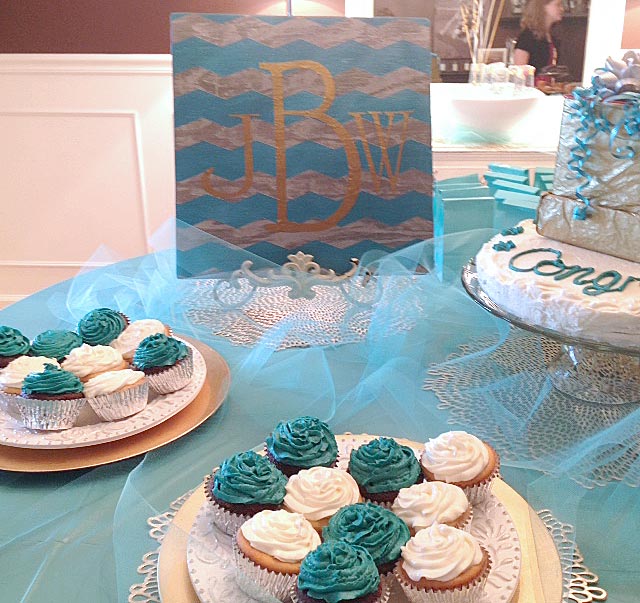
As part of the shower decor, I wanted to create a focal point for the cake table that could also double as a gift my sister could take home with her. This is what I came up with (these are baby’s initials):
This project was super quick, easy and absolutely free, considering I already had on hand all the materials I needed! You could do this for a baby or a bridal shower, as the initials would work for a couple, too.
I started by cutting out a square from an old piece of plywood that was stored in our garden shed. Then I sanded all the sides really well.
For years, the only power saw I would attempt to use was my beloved miter saw. I’ve since gotten pretty comfortable using this skill saw. I have no idea why I shied away from this tool before (aside from the ever-present thought of cutting off my fingers). It’s my new BFF. It cut this plywood like buttah.
Next I gave the plywood a coat of Rust-Oleum® Universal®* in Weathered Steel. After that dried, I applied bands of Chevron FrogTape®, spaced about one and a half inches apart. If you have only regular painter’s tape on hand, you can do stripes or create a chevron shape using a craft knife. (Tip: Cut the chevron shape in your painter’s tape first before applying it to the board or it will scratch the finish.)
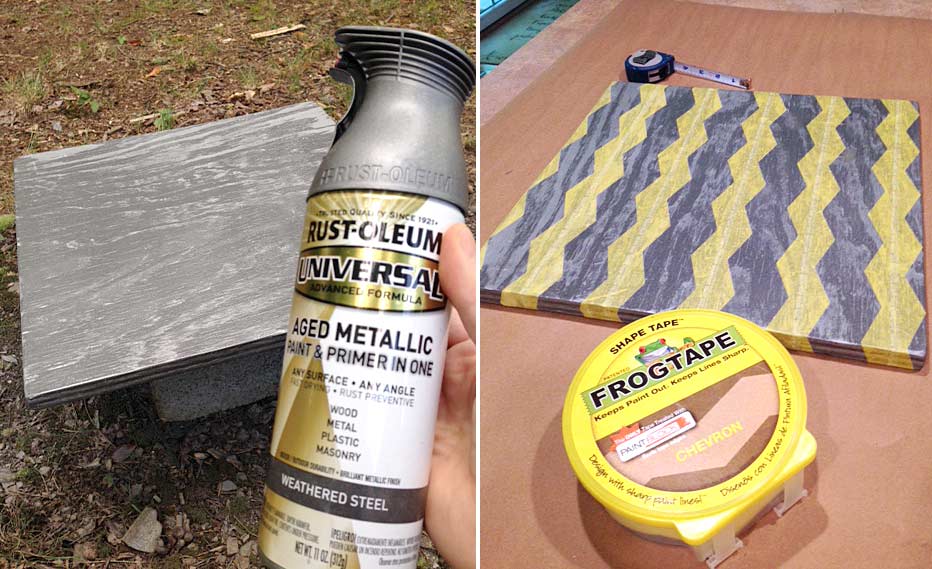 I brushed on the second layer of paint, which was a sample pot of turquoise chalk paint I got at a Haven conference a few years ago. Any spray, chalk or acrylic paint should work, though. I chose to paint the sides of the piece, too, to get rid of those noticeable, raw plywood edges.
I sealed the piece with a coat of Rust-Oleum Satin Clear Enamel. To add the letters, I cut them out on gold adhesive vinyl using my Silhouette electronic cutting machine. If you don’t have one of these nifty tools, you can use my tracing method and simply fill in your letters with gold paint or a permanent marker.
I apologize I didn’t get very good photos of the finished product. I was trying to host a shower at the same time and only had my phone on hand to take the pictures. #bloggerfail
What do you think of my no-spend shower decor and keepsake?
* Affiliate links are provided in this post for your convenience.



Your plywood frame turned out really nice. Good job! Could you tell me the size the plywood was cut? I would like to make one,but in a different colors. Thanks!
Thanks for the great feedbakc, Linda. I made mine 15″x15″.
I loved it sis thank you SOO much for the beautiful present and LOVELY baby shower, it was so nice!!!
You are very welcome, sis! Can’t wait to meet little man. 🙂