
My thrifty curtain project (that only looks good through squinted eyes)
I must have gotten overly confident with the recent success of Mission: Couch Rejuvenation and the DIY patio set, because I took on a serious stenciling project when I had neither the time, nor the energy to devote to making it great.
To give you the CliffsNotes version of the story … I started with four of these curtains I found on clearance at T.J. Maxx:
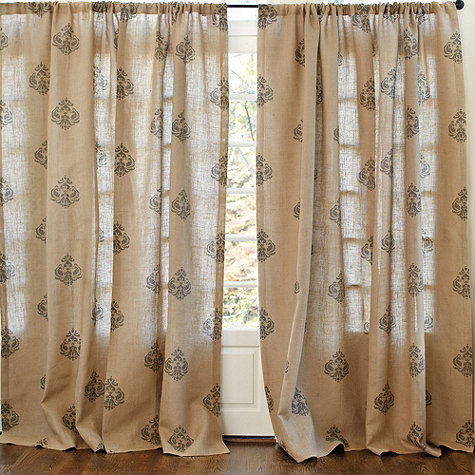
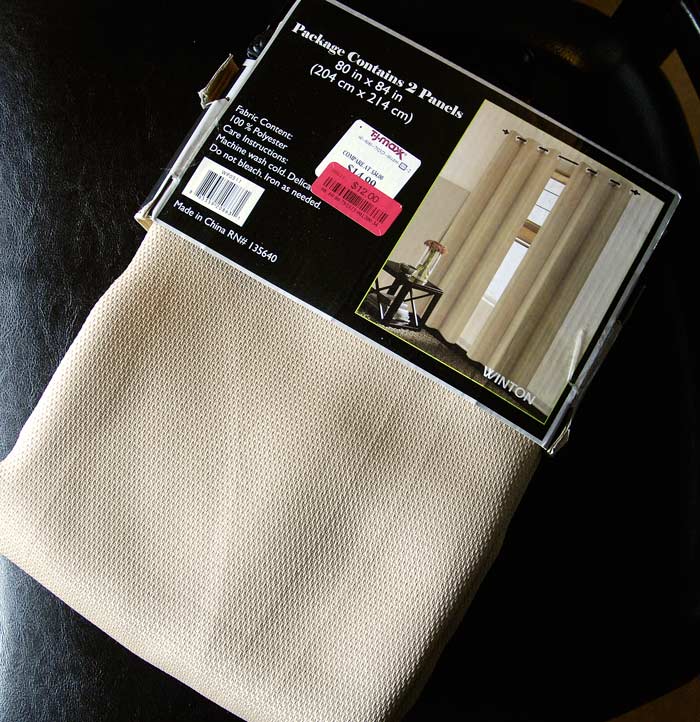 I got all four panels for $24, a serious steal in my opinion. My plan was to stencil them to look something like this Ballard Designs set and hang them in the dining room:
So I laid out my clearance curtains on a painter’s dropcloth and got to work. Never mind the fact that it was 4 p.m., the kids were up from their naps, the mister had just walked in the door, and everyone was asking about dinner. “No prob,” I thought. “I can whip these out in no time.”
 I took out a few bottles of acrylic craft paint, added some textile medium to it (so the paint would adhere to the fabric and make it washable) and started stenciling the curtains using stencils from the Martha Stewart Crafts collection.


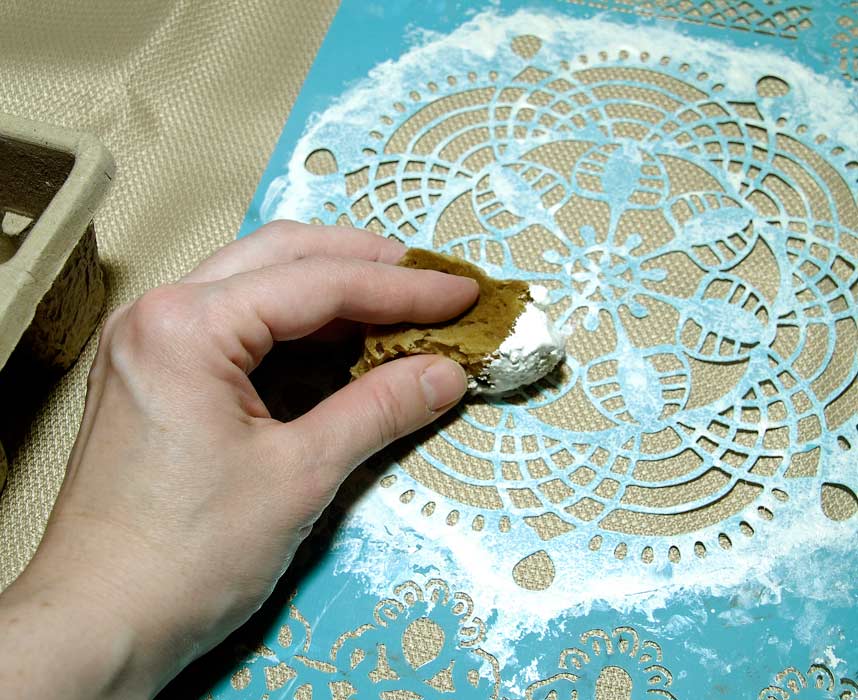 Note: Instead of the beige paint, I used a bottle of white for the larger stencil. (That bottle is not shown in the photo.)
This is when things got hairy.
Problem Numero Uno: I should have secured the stencils better because it became very difficult to keep them in place and prevent the paint from bleeding under the edges.
Problem Numero Dos: I was rushed for time, so I got sloppy with the application.
Problem Numero Tres: I added too much textile medium to the white paint, so the large white stencils came out translucent-looking.
In the end, this is what I got: Dining room curtains that only look good if you cock your head to the side and look through squinted eyes.
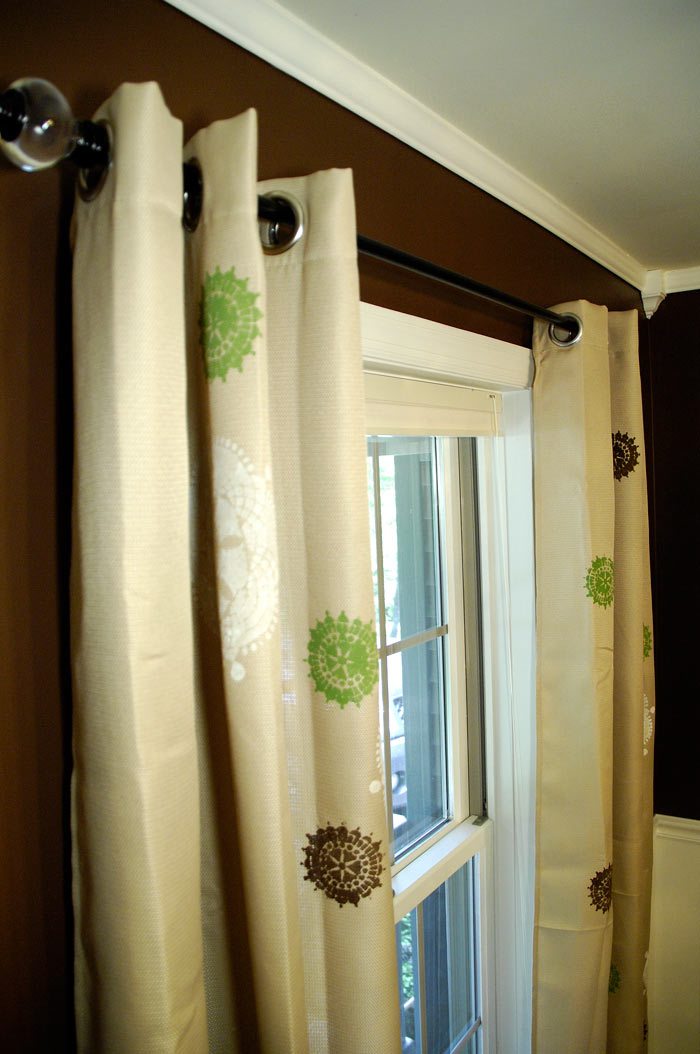

I will say that the one good thing these curtains provide is a perfect transition between our living room/foyer paint color and the dining room paint color.
 So even though I’ve been humbled by yet another craft project, I hope you can use this idea as inspiration, learn from my mistakes, and go create your own gorgeous, thrifty curtains that you don’t have to look at all squinty-eyed. 🙂
Have you experienced any craft project “fails” lately?
![#003: Seasonal decorating for less – 10 strategies [Podcast]](https://livingrichonless.com/wp-content/themes/hueman/assets/front/img/thumb-medium-empty.png)


I think they look pretty in the pictures! 🙂
I have definitely had experiences like that. And even though everyone says it looks fine, I’m the one who will be looking at it all the time. And every time I look at it, I will see the flaws and be reminded that I didn’t take the time to do it right. lol
So true, Sarah! 🙂
I think you’re very brave to try this and it looks great!
Fantastic idea.
They look pretty good, far better than I could have done!!
They turned our great, and I can see the areas I’m not crazy about on my projects too. Great feedback on the paint medium, good to know
xo, Tanya
Oh honey don’t be too hard on yourself they look rustic, handmade, beautifully imperfect. I am a stenciler myself and like uber perfect which stenciling sometimes doesn’t lend itself too. your imperfect curtains inspire me to try my own and relax a little and also make some beautifully imperfect pieces also
I think you are your own worst critic! They look great from where I am. 😉 I have a pair of plain taupe curtains I have wanted to do something with but was never brave enough to try anything… until now. Thanks for all the helpful tips and inspiration. I think they look Great. Blessings!
I think they look great & the flaws just make them more unique although if you’re like me those flaws will haunt you in your sleep until you either redo them or just ignore them. Do you have more info on how you did the paint transition? I haven’t painted my house yet which is causing me not to finish things due to the fact that my entry, living room & kitchen are all connected by 2 long walls. In my head I can see doing this but didnt know where to separate the colors or if it would end up looking crazy.
Don’t do it unless you like to break all the rules. Paint at a natural break like where two walls meet, meaning that the shared wall gets painted the same color and the end wall is a different color. OR if you had a half-column or vertical beam (floor to ceiling) to “divide” the two rooms, you can then paint the two rooms separate colors. Rooms that are so visible from one to the other benefit from using close tones of the same color: for example, use two “colors” from the same paint strip.
Yes, this is a common challenge. Hopefully I can explain how we did ours … if you can’t picture it, let me know. I could post a photo on Facebook so you can see what the transition looks like behind the curtain. Where the wall meets the ceiling, there is a sconce that looks kind of like this: http://st.houzz.com/simgs/12e1c083002a5a36_4-2889/modern-fireplaces.jpg. We painted a white strip about 3-4 inches wide from the sconce to the top of the chair rail molding. So it looks a bit like a column separating the foyer from the dining room. On one side of the “column” is the foyer paint color. On the right side is the dining room paint color. You could also do this using real column molding, which will give it a more upscale look. Here are a few idea examples: http://vrielingwoodworks.com/wp-content/uploads/2012/11/IMAG0683.jpg; http://s773.photobucket.com/user/jautor/media/AVSforum%20Link%20Photos/Woodworkcloseup.jpg.html. Hope this helps!
Thanks to both of you! I was thinking of using colors from the same chip for the foyer living room wall since there’s no break between the rooms unless you use the cutout wall thingie they put between the dining/living room. The big issue is the wall in the kitchen/ living room since there is a floor transition there & then the patio door.
I think they look great I need to make curtains for my brothers Large Living room and this would be much easier to do thanks for the tip. I have been redoing his house from top to bottom.
Ooh, you’re a great sister! What a huge undertaking.
Susan, I’m starting some stenciling projects myself and refinishing a desk, so thanks for the tips here!
I think that the curtains look very nice. (No squinting necessary!)
Good luck with your stenciling project and desk. I’m sure they’ll turn out great!
I love that you still hung them up even though they weren’t “perfect” 🙂 We All, I am sure, have craft projects hanging around our home that the idea may have been prettier then our version! Good luck and great score on those panels!!
Thanks, Jennifer. You should have seen the DIY Valentine’s Day wreath I hung up this year. Total disaster. But my daughter loved it, so that’s what mattered. 🙂
Only you need to squint at your curtains. If your friends or guest do, too, you don’t need them at your house (much too critical). We are usually our own worst critics, seeing our own flaws & mistakes that everyone else will not. As far as I see, your only mistake was feeling rushed (so you KNOW you didn’t have time to be a perfectionist). Next time, schedule more time so that YOU can feel satisfied w/ your effort. These look very nice in focus.
These are beautiful! You would pay extra to have them hand-painted! I love the design and colors you chose…..remember, you are always your own worst critic!
That’s sweet. Thanks for the encouragement, Linda.
Great idea and my opinion is that it looks great! I have had many failed craft attempts so you are not alone (although your failure versus my failure is on a different spectrum as I don’t consider your curtains a failure at all). One particular attempt that stands out to me is a recent canvas for my son’s room. The idea on Pinterest seemed so simple but isn’t that where everyone’s failed attempt starts?!
I am changing the wall color in my bedroom and had resigned myself to also changing the drapes. I’m now thinking that I can stencil the old drapes with leftover wall paint instead. Well, it’s worth a try. The drapes are a neutral gray with green undertones, and the walls are going to be a bright blue. I painted a sample area next to the window and I can see that the drapes can’t remain as is. Wish me luck.
You can do it, Susan. 🙂 Remember to take your time; tape the stencil down to keep it from shifting around while you paint; and, most importantly, offload your brush of all excess paint so it doesn’t seep under the stencil. Good luck!
Beautiful! !!
So what should you have done to keep the stencil from moving? I agree with the others that I really like it. The colors are great with the wall. This idea will give me more options for my blue/teal-colored kitchen that I’m having a hard time finding a fabric to complement.
I now tape down every.single.stencil sheet I use to keep it from shifting. Also, offloading excess paint will help keep the paint from bleeding under the stencil and creating rough/smudged lines.