
DIY beadboard shaker peg coat rack
I am thrilled to report I am done with my beadboard shaker peg coat rack! I am so proud of this project because I did it all.by.myself without asking anyone for advice or help. AND I used scrap lumber for most of the build. Plus I learned how to use a new saw. Yesss!

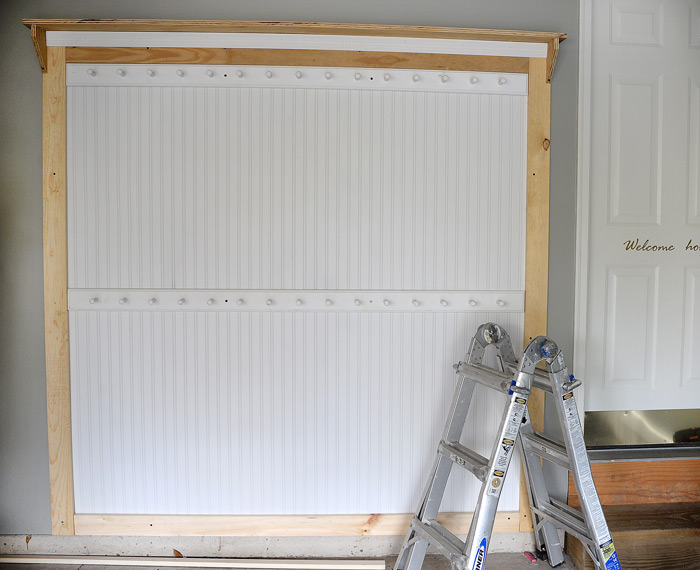
This two-tiered coat rack is super functional for our family because it has a lower rack that is within reach of the kids, an upper rack for adults, and tons of pegs for all our coats. Plus it’s located in our garage right where we enter our home, which is really convenient.

Below are step-by-step instructions for how to build your own two-tiered beadboard shaker peg coat rack.
Step 1: Start by adding a swath of beadboard wallpaper on the wall that is the width and height of your project. (Tip: Be sure to place your wallpaper so the framing boards will overlap the edges slightly, preventing the seams from showing.)

Step 2: Install two shaker peg coat racks over the wallpaper – a higher one for adults and a lower one for the kids. I ordered mine very inexpensively from this Etsy shop. (Tip: Be sure to screw your racks into studs, so they will support the weight of a lot of coats.)
Step 3: Attach boards on the left and right sides of the coat racks. Attach a bottom board to serve as the baseboard. I used leftover 1×3-inch pine boards for this, screwing them into wall studs. (Tip: A counter-sink drill bit pushes screws slightly below the surface of the wood, allowing for easy coverage with filler and paint.)
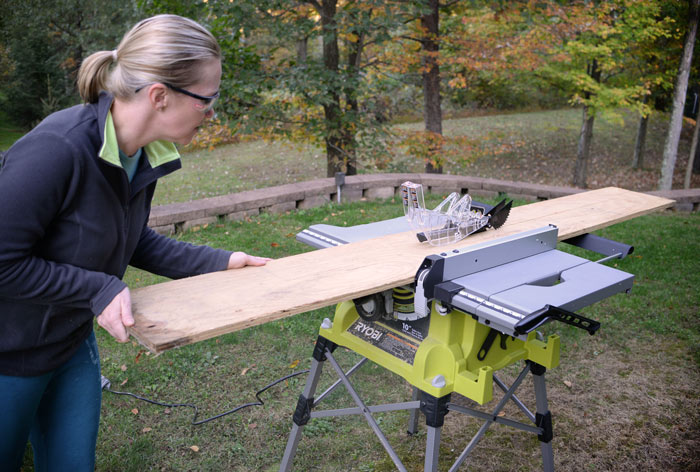
Step 4: Rip a piece of scrap plywood for both the top shelf and the board above the top coat rack. I used my new favorite tool to do this, the Ryobi® 10-inch portable table saw. I’m happy to report no fingers were lost in the process. 🙂
Step 5: Make your own shelf brackets out of the remainder of the plywood. I cut mine out on my miter saw. I attached the brackets using screws, but there is probably a better way. 😉

Step 6: Use a brad nailer to attach a piece of window/door casing below the top shelf and to attach the top shelf to the brackets and back board.
Step 7: To hide the unsightly, raw edges of the plywood (and the screws in the shelf brackets), iron on a strip of birch veneer.


Step 8: Sand the rough spots, caulk the holes, and prime and paint.
I used my favorite Purdy® brushes* to prime and paint all the raw wood, paying particular attention to the knots. Pine knots can bleed through paint, so be sure to prime these areas very well before painting.
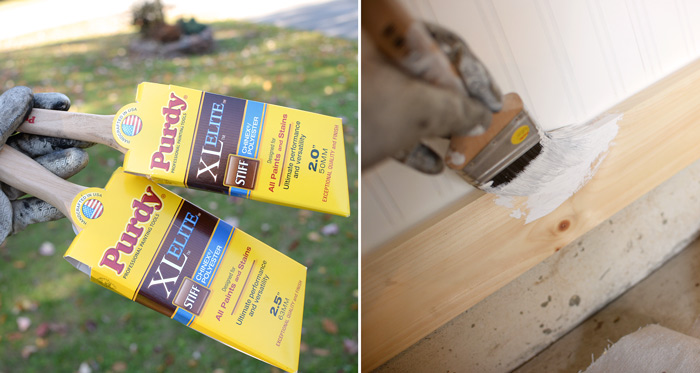
(Tip: A quality paint brush can make ALL THE DIFFERENCE when cutting in around edges, helping paint glide on smoothly and providing a straighter line.)
After priming and painting the boards, I taped off the whole project and spray painted it the same color as our window and door trim. I used my beloved HomeRight® Finish Max sprayer to do this. Enter to win your own here.


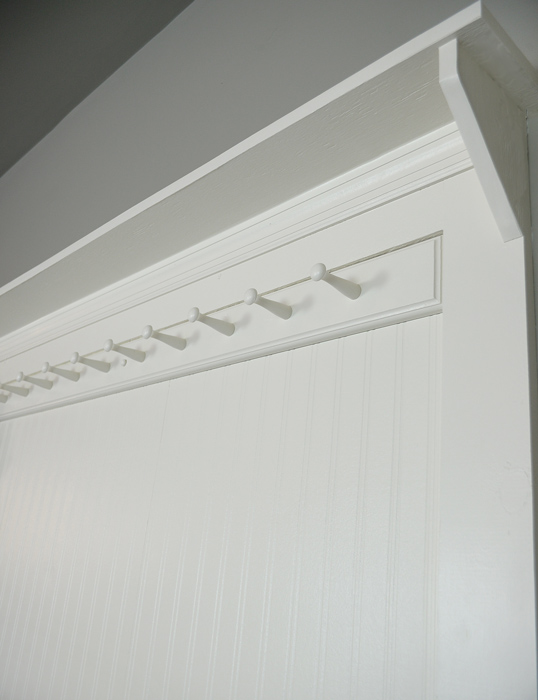
Done! A flawless paint finish on my new coat rack.

What do you think of the results?
* Affiliate links provided in this post for your convenience.
Special thanks to Ryobi and Purdy for providing, at my request, the table saw and paint brushes needed to complete this project.


Really cute. It would also be great for a mudroom or garage entry.
Beautiful job! I’m impressed!
I had no idea that this coat rack’s back was wallpaper! What a great idea, I love how it turned out, great job!
Thanks, sis!
After years of a slow moving dibilitating terminal disease I have receiver notice that the word ‘cured’ is official!! My first project would be a headboard for the guest room, then a small dresser, then a bedside, then a whole room and then…… more, more, more!
Congrats on your wonderful prognosis and best wishes on your projects. God bless!
Fabulous