
Thrifty transformation: How to paint a door to look like wood
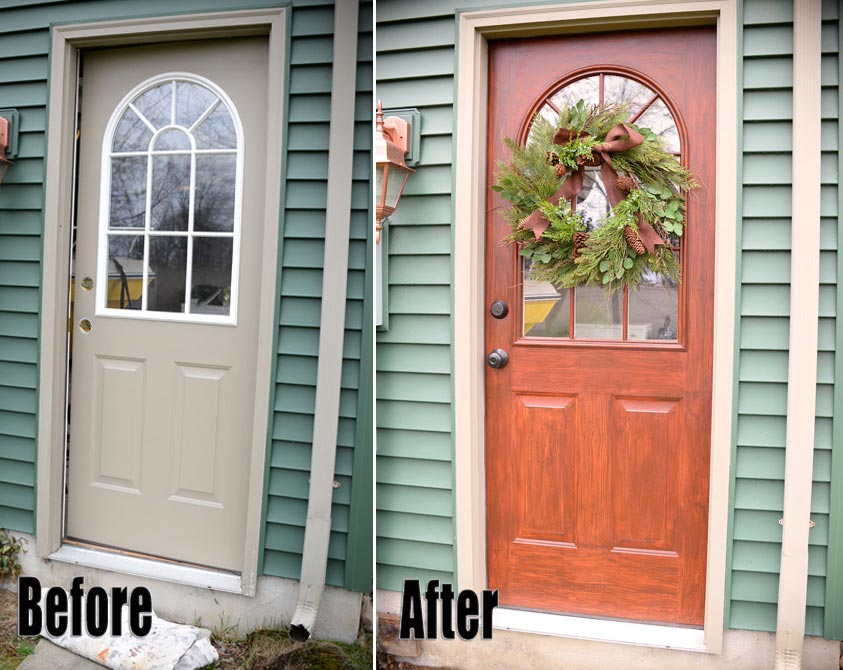
For a few years now, I’ve been wanting to spruce up the side door that opens into our garage. This is what it looked like “before:”
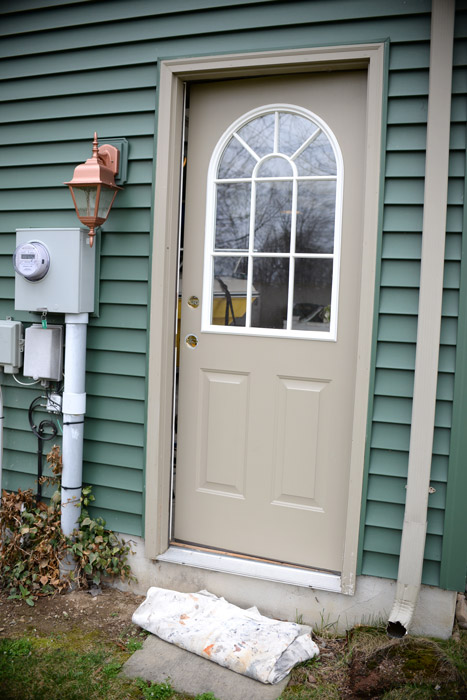
As you can see, there’s nothing really wrong with the door, per se. (Yes, normally the hardware is intact.) 😉 The only part that really bothered me was that the trim around the windows was left white. I originally planned on simply painting that to match the tan on the rest of the door.
But after thinking it over, I decided to make this door look richer – like a brand new, expensive, solid wood door. And I knew I could achieve the look using my faux wood grain painting technique. This technique will give the appearance of a high-end, solid wood door – even close up – for under $40!
After removing the hardware and cleaning off all the cobwebs and bugs, I gave the door a once over with a coat of exterior flat paint.
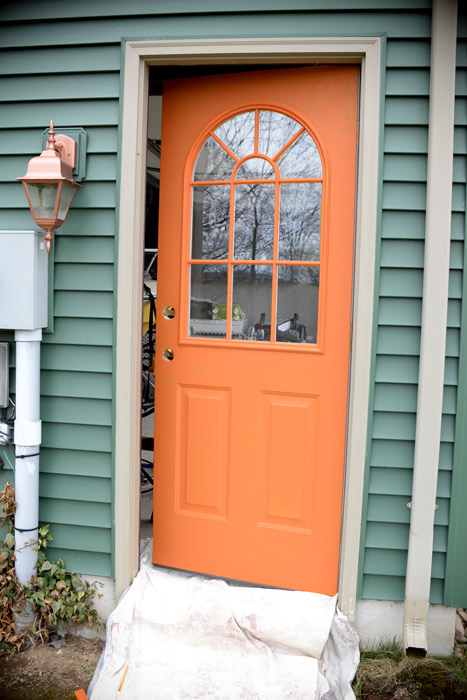
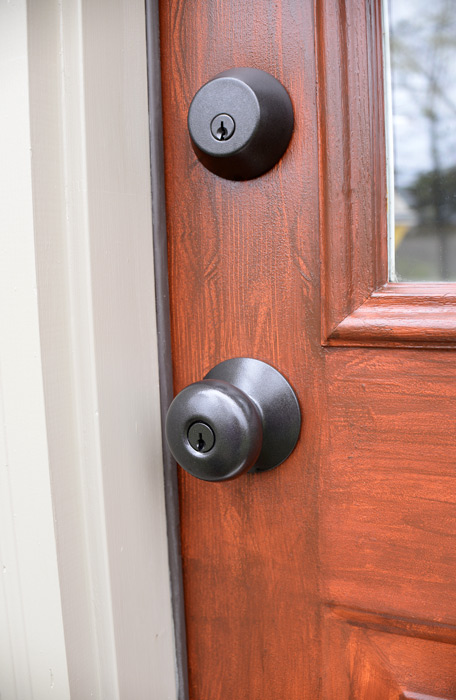
I chose Clark+Kensington® Paint & Primer in One – in Copper Pot, purchased at Ace Hardware.

I chose the orange color because I wanted a finished result that mimicked a cedar/cherry wood look. I would recommend choosing a base paint color that matches the undertones of whatever wood you want to replicate.
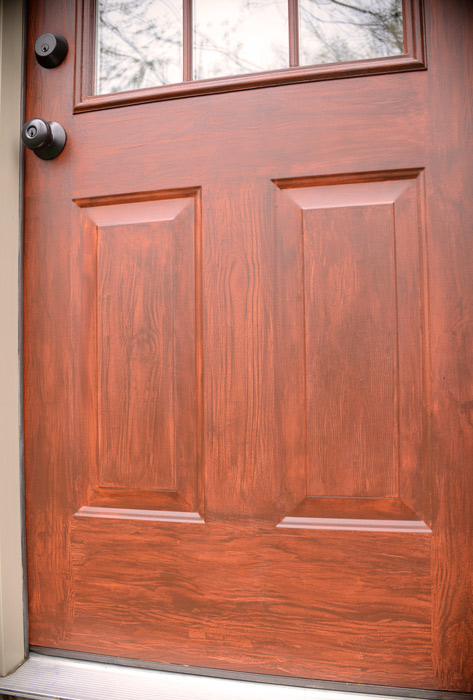
After the paint dried, I mixed together portions of two tubes of Minwax Water-Based Express Color Wiping Stain and Finish.* I chose mahogany and walnut and ended up using a little more of the mahogany. (This thicker wiping stain or a similar gel stain is key for this project. Regular stain will not adhere to painted pieces.)

Then I used a good paintbrush (Purdy is my all-time favorite) to apply a coat of the mixed stain to a small section of the door, attempting to create a natural wood look.

I had my laptop nearby the whole time, displaying a photo of a door I wanted to replicate. This gave me a clear picture of the direction, appearance and texture of real wood grain.
I used this handy wood graining tool to create realistic knots and different types of wood grain patterns in the stain.
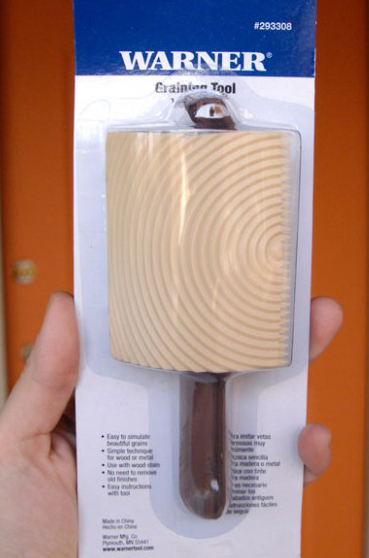
This tool is tricky to get the hang of but, once I did, I was impressed with the results!

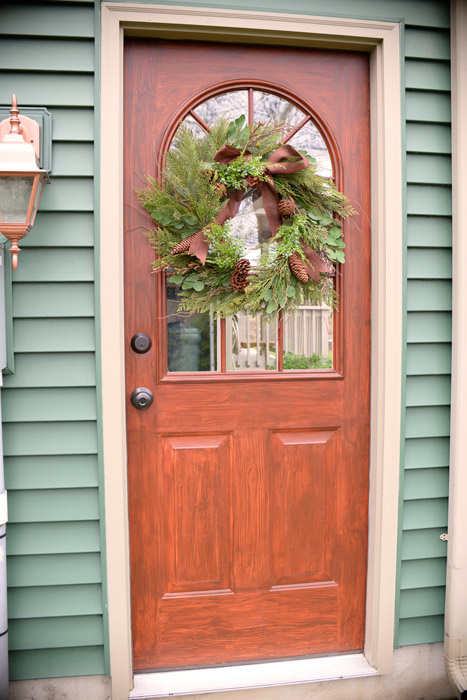
Together, the exterior paint base and wiping stain create a superior, durable finish. I used this exact same technique on our front door and it has held up spectacularly well for several years. We have a dog that jumps on the door every day and there is not one single scratch in the finish!
Here’s a look at our “new” side door:

 The door hardware was previously gold. I spray-painted it oil-rubbed bronze to give it a more modern look. I’ll share all the details of that project in a post later this week.
What do you think of my thrifty door transformation?
* Links to products in this post are affiliate links. Purchasing though these links will not cost anything additional, but a small portion will come back to Living Rich on Less, helping me continue to provide great, free content. Thanks in advance for your support.
I’m linking this up to My Repurposed Life.


Wow, that looks really nice! Did you put additional topcoats on? I really like how this turned out. Thanks for sharing, can’t wait to see how to use the wood grain tool.
I did not … just the wiping stain, which claims it has finish built in. It has held up great so far. I’ve thought about putting an extra clear topcoat on, but haven’t yet. I may do that to the side door because it is exposed to the weather more than our front door. Thanks for stopping by. 🙂
Wow that looks great, I’m going to give that a try. Thanks for the great tutorial.
Great look! I have been wanting to “wood faux” our white garage doors, but every time I bring it up, my DH gives me that special look. The metal already has a raised grain, and in my mind it looks fabulous!
It turned out so pretty! That wood grain tool is amazing!
Thanks, Shanna! 🙂
Where did you get the minwax gel stains
You can get them pretty much anywhere … Walmart, True Value, Ace Hardware, etc.
I have several exterior doors that need paint – your spectacular results make me want to get on that right away! Thanks for the inspiration.
You are so welcome, Kay. Remember to work in small sections. The stain dries pretty fast. 🙂 Best of luck with your project and thanks for stopping by!
This is a beautiful door project! Is your door made of metal or wood?
I believe it’s steel … either that or fiberglass. Not wood. 😉
Wow! Susan–I’ve seen those tools, in fact I think I have one somewhere in my craft stash. You did an amazing job making your metal door look like wood.
catching you next week
gail
Both door look great! How did you do the trim around the windows with all the little edges?
Very carefully with a great, Purdy trim brush – and an artist’s brush in some tight spots. 🙂 I still think it was faster than taping everything, but you always have that option.
Where do you find the wood grain tool, a craft store or a Lowe’s or Home depot? The door looks fantastic and I need to do our front entry door. If you were to want a very rich mahogany color would you go with an almost maroon base coat or maybe even black and then use a cherry and Mahogany stain combination over all?
Hmmm. I’m pretty sure I picked that tool up at Lowe’s. If I were to do a Mahogany-colored door, I would begin with a deep, brownish red like this http://bit.ly/1JdpZ9W. Then I would probably use the Minwax Express Color in a combination of the Walnut, Onyx and Mahogany (maybe even Crimson), mixed together until I got the dark color I wanted. I think it works best to use the Express Color to darken the door, rather than vice versa. I’m not sure it would look like authentic wood if you used black then put red over it. Just my suggestion … Best of luck with your project, Jennifer! 🙂
Hi Susan, could you tell us what temperature extremes you have where you live? I live in western NY (near lake Erie) where winters get to 20 degrees below sometimes and summers up to 100 degrees. I wonder if those water based stains you used would hold up to the weather here.
I’m in central PA, so I’d say we could get down to about -10 and up to about 100 degrees. I’ve had zero issues with peeling. The finish is holding up beautifully!
Can you please tell me the colors of your siding and trim?? Thanks!
Wow, that looks amazing. It looks like the real thing. Thank you for sharing your craft.
Do I need to do anything differently on the plastic trim around the glass?
Nope. I just used the same stain over that.
My front door has been on the house and in awesome shape however, the house wasn’t lived in for 20 years, bees took over the entrabcewsy and there is this “stuff” on the door and side panels that I can’t get off without a sander. I have painted the trim on the little windows but want to do something with all the black, inside side of the door as well. Any suggestions?
Hi. Absolutely LOVE this and am going to try it! I just wanted to mention I have a friend who did faux wood floors in her house; instead of the rather expensive tool to mimic the wood grain she found a child’s shoe at a second hand store that worked excellent- for those wishing to keep the cost down!❤️