
Front door redo using faux wood grain technique
Ever since we moved in nearly three years ago, our front door has been red.

Don’t get me wrong … I love a red door. But next to our green house, it sort of made it seem like Christmas all year long. 😉 And the painter never painted the door’s window trim, so I always felt it looked unfinished.
My dream was to totally replace it with a solid wood door, until I looked at the prices of solid wood doors. I needed a much thriftier solution! So I decided to try my hand at painting the existing door (it’s either fiberglass or steel – I can’t tell) using a faux wood grain technique that looked easy enough in the YouTube videos I watched. (Cue ominous music.)
I started by taping around the door’s windows, removing the hardware and patching a screw hole. Then I gave the whole thing a once over with a coat of orange-based exterior flat paint (Clark & Kensington Paint & Primer in One – in Copper Pot, purchased at Ace Hardware).
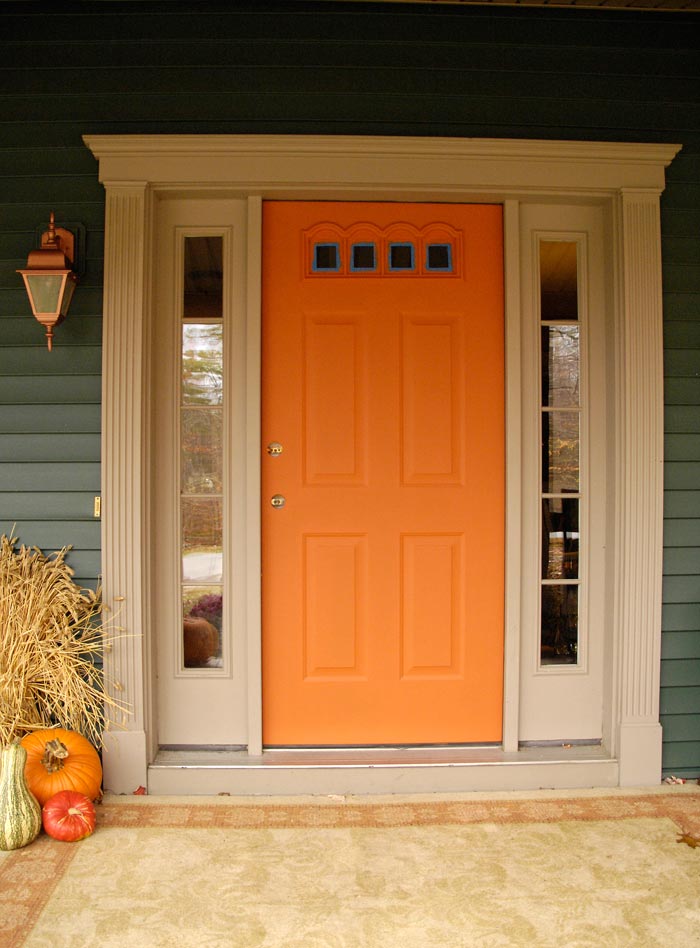
I chose the orange color because my goal was to create a cedar/cherry wood look. You’re supposed to choose a base paint color that matches the undertones of whatever wood you want to mimic.
This is when I got a few double takes from the neighbors. It was really orange. 🙂
Next came that all-too-familiar, sweaty, freak-out portion of the project. I started by mixing together portions of two tubes of Minwax Water-Based Express Color Wiping Stain and Finish.* I chose mahogany and walnut and ended up using a little more of the mahogany.(You’ll want to use this thicker wiping stain or a similar gel stain for this project. Regular stain will not adhere to painted pieces.)

Then I used a good paintbrush (Purdy is my all-time favorite) to apply a coat of the mixed stain to a small section of the door, attempting to create a natural wood look. I had my iPad handy the whole time, displaying a photo of a door I wanted to replicate. This allowed me to get a clear picture of the direction, appearance and texture of real wood grain.
Next I brought out this handy wood graining tool:

This tool is tricky to get the hang of but, once I did, I was impressed! If I didn’t know the door was painted, I would have sworn it was solid wood. This tool allows you to create realistic knots and different types of wood grain patterns based on which edge of the tool you use.

I had to take a lot of time painstakingly going over the door until I felt the color and look of the grain was perfect. It took patience and some technique, so I wouldn’t exactly say this project is great for beginner painters. But, wow! I was happy with the end result.

Check out my little photo bomber!

It’s important to apply two coats of sealer to the door after the stain dries (about 24 hours) to create a durable finish. I’ll be taking off the hardware again today and finishing up that portion.
I can’t believe I waited nearly three years to do this project! It has completely transformed the look and feel of our home. And I only spent a little less than $40 on everything.

What do you think of my new “wood” door?

* Links to products in this post are affiliate links. Purchasing though these links will not cost you anything additional, but a small portion of the profit will come back to Living Rich on Less, helping me continue to provide great, free content to you. So thanks in advance for your support!
I’m linking this up to Craft Dictator, Love of Family & Home, All Our Days, Dear Creatives and Fluster Buster.


It looks awesome. We have a red door too and I was thinking the other day about changing it. Brown metal roof, brown aluminum windows, off white vinyl siding. :-/ Any ideas? 🙂 http://www.fifisfilosophies.blogspot.com
Well, now I’m a big fan of the wood look! 😉
I love the wood look too but I think I’m scared to try it. LOL
I was scared, too. But I figured, it’s just paint, right?
So I have a blue steel door that already has the wood grain look do you think I can I just use your stain recommendation
Over the blue color?
Your door looks awesome!
Yep. Just make sure you give it a “base” color first, such as the orange I used. You won’t want to just slap the stain over the blue because it’s too transparent and you’d end up with a wonky color.
Sue, what type of sealer did you use on your exterior door? I am using your technique on my INTERIOR door. Do I need to stain that door? I would think so but wanted your advice…. Also any advice on using this graining tool? My stain looks terrible….BTW, your door looks FABULOUS 🙂
As far as sealer, I used the Modern Masters MasterClear satin topcoat. I’m not sure what your door looks like exactly, so I’d have a hard time giving you specific advice. I would recommend using the exact technique I did and working in one small area at a time. The graining tool takes a bit of practice. I probably went over each spot, like, 20 times before I was happy with the look. I know you can do it. Best of luck with your project, Nina!
I have done this on interior door and a wall….instead of stain I use paint mixed with a clear glaze for a translucent look. I use two shades, it gives it dimension. Of course, you still start with the ugly base….I used a mustard color. Turned out great!
Great idea, Shelly. Thanks for stopping by and for your feedback. 🙂
Your door looks fabulous! I know you are proud of the end product. And remember that your door is so much more energy efficient than wood doos so you really saved money by doing this!
Thanks for the feedback, Sue.
Really impressive job, and it looks great. I will say that the green/red or burnt orange is a classic arts and craft combo so I like the other look too (except for the white part!). that’s the beauty of paint.
Very pretty…I recently painted my solid wood, walnut stained door RED! I love my red door, but I have a white house with black roof and black shutters. The brown wooden door didn’t do a thing for it…the red one just looks great. I also have a beautiful oil rubbed bronze glass storm door over the red door. My dear sweet hubby added lights between the two doors so the red door glows at night. Looks like a little jewel box…not like of a “red light district”.
Yes … Your home sounds like the perfect color combination for a red door. I’ll bet it looks stunning!
That looks fantastic! Great job.
I love it! It is beautiful!! How did you know what base color to use?
I basically held it up to a swatch of cherry wood in the store to check the undertone.
Your door looks amazing–beautiful job!! Love your blog!!
Wow, Susan. The door looks great. You did a great job of recreating the look of a wood door.
Your door is stunning! I don’t know if I’m brave enough to try it. My door is steel. It also is red and I’m sick of it!
You can do it, Judy!
Thanks for the vote of encouragement. 🙂 I’m going to give it a try. After all, the worst that could happen is that the door would look awful and I’d have to re-paint it and THIS time it won ‘t be red.
Wow, that looks amazing, great job. Our door is metal and white. My husband is so afraid of color, but maybe just maybe he would go for something like this.
You can do this same technique using a grey stain to get a white washed wood look. Consider splatting a few various sizes specs of black after the wood grain tool gel has dried, and in the wiping gel wash coat. Use a hand held natural whisk broom to spread the stain along the intended grain lines of your “boards” . Some suggest spraying each layer with a non oil based spray lawyer to create the best depth. Using oil based “sealing layer” may soften the oil based gel stain, disrupting your wood tool work. Be patient and let dry each layer. Japan drier additive can be added to the gel to speed the time…read the directions. When complete use a hard core sealer in two coats… I’ve used Helmsman Spar varnish which is high quality, uv protectad and durable. Practice? Spray a 1/4 sheet of cheap faom insulation board white and practice your knots!
Always remember…dark over light. (Think today’s politics)
I love the new look! Very creative! I didn’t know there was a tool out there to mimic the wood look! My house is very similar color to yours but we have white doors! Beautiful! Great job!
What?! That looks amazing!!!
That looks amazing! I’ve always wondered if those wood grain tools work…guess I know now! Looks completely like wood to me!
They work … but they’re tricky. Work in small sections and take deep breaths. 🙂 Thanks for stopping by, Abby.
That is SO awesome! I had considered gel staining my door but when I was looking into it, seemed to only find people with wood graining already on their door – This is exactly what I needed! Question: After wood graining the door, did you apply light stain over that to achieve the color you were after? I’d think you would be able to take one swipe at the graining part, and then if you wanted it darker, could you put a layer lightly of the stain over it and still have the grain show through?
So glad the post was helpful. Yes, after the first coat of stain, I did take a brush dipped in the mahogany stain over portions of the door that I wanted darker or to soften the “grain” a bit. I will say, however, that once you get that first coat of gel stain on, the next layer will not adhere quite as well.
This really looks wonderful even if it took forever! If we ever get around to re-doing some doors I will keep this in mind for sure! Thanks for sharing!
I love your door and want to try it on my front door only on the inside. I have every thing but a gel stain. I wonder if I can put anything in my reg stain to make it like a gel? Great job.
Hmmm. Good question. I would probably stick with purchasing a gel stain. The thicker, paint-like consistency is really what causes the color to stay and not wipe off. In the past, I’ve tried going over furniture with regular stain to give it a darker finish. I was always disappointed with the results because, over time, the stain would literally rub off if you touched it too much.
Hi…I love your door. Did you stain as it was hung? I have a dark green door, green shutters and ivory siding. I am thinking of painting the shutters black and would love a wood looking door. Do you think I should paint the door first a different color and then do the graining? Any suggestions would be helpful. Thank you Kim
I painted my door first in an orange-y color before I put the gel stain on it. Yes, I painted it while it was still hung. Hopefully, the post gives you most of the details as to the steps I took. You should have no problem changing up your dark green for a wood grain look. My original door was red.
Wow! This is amazing and was just about to invest in some expensive, wood doors. We have ugly, steel, insulated doors but this would improve it tremendously! (They came with the house). I would like an oak look but darker like yours. Any thoughts on an undertone color for that?
I’m glad you like the project, RJ. My faux wood door is honestly one of my favorite DIY projects ever. If you want to go with an oak look, I would probably recommend starting with a paint color with a yellowish-brown undertone. Here’s what I did that helped me pick the right paint color: I grabbed a few paint swatches from the paint department and took them to the stain department where they have those Minwax boards with a whole bunch of stain samples featured. I held up my swatches next to the wood stain color I wanted to mimic and picked the one that matched the best. I hope that helps! Best of luck with your project. Remember to go slow and work in small sections when applying the wiping stain and using the wood grain tool. Thanks for stopping by. 🙂
Your front entry door looks awesome after the transformation! The same technique can be used for metal garage doors. However, the wood graining tool may be too difficult to use consistently for a large surface area like a garage door. A wipe down faux painting technique can be used. Home owners looking for the look of a real wood garage door to improve curb appeal, but on a limited budget will find this faux wood painting technique useful. Although it will not look as good as real or faux wood garage doors like those shown on http://www.faux-wood-garage-doors.com the costs of faux painting a metal garage door will be a lot less than buying a new wooden or faux wood garage door.
Faux Wood Garage Door Painting Steps:
Pressure wash your garage door. After drying use Denatured Alcohol soaked in an a clean rag to remove grime that have accumulated over a period of time on the garage door surface. Lightly sand the door surface with a fine sandpaper for better paint adhesion.
Tools Needed: (1) A couple of good quality 2″ and 3″ paint brushes (2) 4″ and 6″ mini paint rollers (3) Paint tray
Materials & Supplies: (1) Drop cloth (2) Masking tape and paper (3) Disposable gloves (4) One quart Denatured Alcohol. (5) Outdoor UV protected paint base color with no gloss added (matt finish). A commonly used base color is Sherwin Williams (www.sherwinwilliams.com) Monarch Gold. Other brands can be used provided it closely match the Sherwin Williams Monarch Gold. One gallon to start. Quantity depends on size of door. (6) Sherwin Williams Woodsy Brown for overlay coat over the Monarch Gold color.
Painting technique is often referred to a faux painting. Google “faux painting” to learn the proper techiques to get an idea on how it works and learn tips and tricks. Always test paint on something resembling the garage like a MDF board on a small area on the back of your door. When you are satisfied with your painting technique and color start applying the base coat SW Monarch Gold on the garage door surface. Use paint brush and roller for this step. Let it dry completely 24-48 hours.
The base paint must be completely dry before apply the next step. Using new a brush apply the Sherwin Williams Woodsy Brown onto a small section (2′ x 2′) at a time. Use a clean rag and lightly wipe down so some of the Monarch Gold to show up. This is where you have to decide how much of the Woodsy Brown color to wipe off. It will determine the final color of your door. Upon completion go on to the next section and repeat the process making sure that the transition to the next section match up to the prior section. Make sure the transition is smooth and there is no hard break from one section to the other.
Wait 24-48 hours for the paint to dry. Apply a coat of matt UV protected clear coat to give it the faux finish an added protection. Your “new” faux wood garage door will now look like a wooden garage door with much improved curb appeal.
Great idea, Lynn. I’ll have to put that in my back pocket if I ever want to repaint our garage door. Thanks for stopping by. 🙂
Awesome job!!! Im basically going for the same look, and I can use some help and your techinique is exactly what im looking for. Any chance you have another project to do that you can vdo? Ive done a far share of woodwork but this in my first faux woodgrain and its a huge project. Any help will be great…
Sorry I don’t have any video of the process. But I’m sure you can “YouTube” it. I did just recently finish my side door using the same technique. You can see that post here: http://livingrichonless.com/howtopaintadoortolooklikewood/ My best advice is to work in small sections. The wiping stain I used dries pretty quickly. And don’t get frustrated if it takes a few wipe on, wipe offs to get the look you want. 😉 It will come together beautifully. It looks way more complicated than it is. You can do it! 🙂
It looks beautiful! I’m thinking of trying this on my metal front door (which also has a rather hideous metal “security” screen door in front of it – typical of Las Vegas homes – that my other half will not let me remove, so Id have to stain that as well. Just from the pictures, it looks like you did not remove the door for this project. If that is the case, how long did you have to leave it open after you stained it?
You’re right. I did not remove the door. I let it dry for about 4-5 hours on a warm day. That’s all it took! Then, over the next few days, I made sure to open it a crack and let it cure a little more to make sure it didn’t stick at any point. I had no problems at all with it sticking.
I’ve been wanting to do this with my inside wood door forever. I believe they are some type of wood, will I have difficulties?
The was so helpful! We’re going to try this technique on our front door. We also love your copper coach lamps by your entry way. Do you mind sharing the manufacturer?
Thanks!
Thanks so much for the kind feedback, Carla. I actually created the copper look on those exterior lights myself. Here are two posts where I share the paint and technique I used: http://livingrichonless.com/thriftyexteriorlightmakeover/; http://livingrichonless.com/morethriftyexteriorlightmakeovers/. So glad the information has been helpful to you and thanks for stopping by. 🙂
Loved the photo bomber! and of course the door! Beautiful talent! I do have a question….any suggestions on what type of wiping material to use? and which do I do first..use the wood-grain tool or the wiping cloth?
Thanks for the feedback, Linda.:) I used a damp rag to wipe off any excess stain and fix any spots I couldn’t get just right the first time. I started with the wood grain tool. This tool takes a little practice, but don’t get discouraged. Once you get a good grain going, you’ll be thrilled with the results. I often had to wipe off my work one or two times before I was happy with the look … but I’m pretty particular. 😉 I would recommend keeping a dry and a damp rag handy next to your stain and the tool. You’ll be using the tool and rags simultaneously throughout the project, if that makes sense. Best of luck to you!
I love your color combination. Do you have any idea what the paint colors were for your siding and trim?
Unfortunately, no. We didn’t build the house, so I’m not sure the exact colors that were chosen. I get this question from time to time and I wish I had the exact colors to give you. My best guess would be an evergreen or hunter green siding and a beige/tan trim. If you get anywhere in the ballpark with these two colors, you’ll be close.
Did you paint the inside to look like wood also? If not, did you leave the sides of the door the interior color? I want to keep my interior white to go w my decor (hope that isn’t too tacky!), but wondered how to manage that with the best result….
I did not paint the inside; I left that white to match the interior of the rest of the house and it looks fine. I literally only painted the very outside of the door, not even the sides, and it looks good. 🙂
I have faux painted doors from previous owners. I am trying to touch them up with Liqutex Heavy body paint I have from art supplies around the house. Is this similar to the minwax gel? Thank You. Graduation party coming up and time to do everything around here is sparse. I’ve already done it but it doesn’t look right in some places. Tricky trying to match someone else’s work and doing a “patch” job! Any suggestions would be helpful.
Hmmm. I’ve never used that product (Liqutex), so I’m not sure how it would perform. You always have the option of starting over with a base coat of paint, then adding the new faux wood grain over that. Best of luck with your project and thanks for stopping by.
Quick question for you….How did you do the trim part around the Windows? Love your door, I am painting mine copper pot as we speak!
I taped the windows off, which was a bit time-consuming. But with another door project, I literally just used a small artist’s brush and carefully worked around the window. Either way will work. Just be careful pulling the tape back off. I like to use a razor to cut the seal between the tape and the paint to keep any paint from peeling off along with the tape.
Not only is your door beautiful, but the info you provided about how to select a primer color was extremely helpful. I am restaining a wood grain fiberglass door but because the current stain is faded more in some areas, I was hesitant to simply restain. Based your experience, I will include the primer step first. Thank you!
You are so welcome, Debbie. Thanks for stopping by. 🙂
Love the door !! We recently installed a white vinyl screen door on our dark brown wood home. I don’t care for the look and want to do a wood look. Will this process work on vinyl? Since we are working with just a 3″ frame instead of a whole door, what do you recommend?
Hmmmm. Well, Lynn, I’ve never tried this process on vinyl, so I’m not sure how the finish would hold up. You could try priming with a really good wood-colored primer that is rated for vinyl, then add the rest of the steps as usual after that. That is what I would try. Best of luck with your project and thanks for stopping by. 🙂
I am doing this omgoodness. It is beautiful.
I am wanting to do a light wood door, our house is a blue color…like a light sandy color. Any tips for that? Our front door is already a light yellow/tan…