
The dining room molding saga continues
In an effort to make good on my promise to finish a DIY project before I start a new one, I went back to work to complete, once and for all, the molding in our dining room – an endeavor I began an embarrassingly long time ago. If you’re curious as to exactly how long ago, click here and here for the deets (there’s also a video on how to cut chair rail molding included in the first link).
I think I was so tickled with the fact that I finished the chair rail that I pooped out on the rest of the molding. It was a classic case of focusing on “to-date” rather than “to-go” thinking. (I cover this concept in the “Become a finish carpenter” chapter of my e-book.)
So last week I went back to work, finishing a portion of the boxed molding.
 I ordered a bunch of eight-foot sections of 7/8-inch wide by 1/4-inch thick pine “picture frame” molding from 84 Lumber. I spent a total of $53.40. The pieces came unfinished so I primed them and gave them a coat of paint before I made any cuts.

 I used the same semi-gloss white paint that covers all the door and window trim in our home.
I measured five inches in from the nearest trim on all four sides to come up with the measurements for my “box.” Then I drew a level pencil square, marking where the outside edges of the molding would line up. 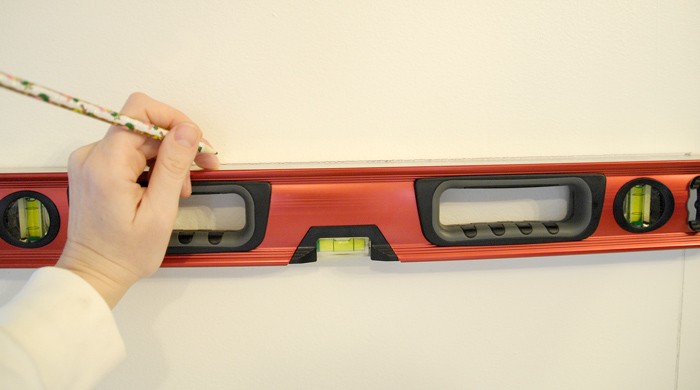 Besides the fact that I have unmanicured nails and am using a “SpongeBob SquarePants” pencil to draw my line, do you notice anything about this photo? Yep … fist bump to all the fellow lefties out there. 🙂
Once I drew a square box on the wall, I used those line measurements to determine the length of each piece and started making 45-degree-angle cuts on my miter saw. I was very precise when cutting (measure twice, cut once, right?) so the pieces would match up.

 I secured the strips to the wall using Liquid Nails. I was originally planning on adding a few trim nails, too, but I honestly think the adhesive may be enough. We’ll see. Tip: If you plan on doing this project, you’ll want to make sure you order at least 15-20 percent more molding than what you think you’ll need. Because the wooden strips are so thin, they have a tendency to split. You also lose a little bit with each angle cut.
After the glue dried, I used a magic eraser to get rid of all the visible pencil lines.
 Then I added a final coat of paint to the molding. It filled in all the seams perfectly (no caulk necessary).
Now I only have about 10 more “boxes” to build and I’ll be done. Sigh. I’m excited to see how the room turns out because it looks sharp so far (in my opinion).
Do you have any unfinished DIY business? I’d love for you to share what you’re working on in the comments section.
I’m linking this up to DIY Showoff, The Girl Creative, Making the World Cuter, Keeping it Simple, Funky Junk Interiors and Finding Fabulous.


Oooh that is so pretty! This is what I’d like to do in my “dining/entryfromthegarage area” Great Job! And Boo Yah to the Lefties~we have a couple in our immediate family! Blessings and Joy!
Might I suggest that you paint your HVAC vents the same color as your walls. They definitely standout in the white and will be substantially less noticeable when they match the wall. I’ve done this in several homes and always get comments from guests about what a great idea this is.
Great idea, Cindy. I actually did this already in the dining room. I’m planning on continuing the white box and chair rail molding into the hallway, so eventually that area will all be white and the vents should blend in. I totally agree with you on matching colors. 🙂
Nice.
Looks great Susan! Can’t wait to see the finished project.
Thanks babe.
Unfinished business??!! Don’t get me started.. ha ha… I actually blogged about it and made a special WORK-IN-PROGRESS linky party, to encourage us all to move forward with our stuff.
Meanwhile though, I want to compliment you on what you are doing here. It’s exquisite! May I invite you to come link it up at http://www.finecraftguild.com/party-63/ ?! Would love to see it there!
Looks great! I love the chair rail and molding combination, it just looks so nice and “finished.”