
How to pour a concrete stair plus more patio progress
We are still in the throes of our thrifty backyard patio project and I thought I’d take a moment to share a bit of the progress with you. Again, here are the plans:
After all these years of DIYing, I’ve finally come to accept that nearly every project I do will take twice as long and cause twice as much stress as anticipated. This project has been no different. 🙂
The good news is that I’ve made significant progress on most of the tasks, the biggest of which was pouring concrete for the new stair.
I started by digging a ditch where the stair would go. I planned the dimensions of the finished slab to be 12 feet long by 16 inches wide by about 7 inches deep.
I have to chuckle because when I was researching how to pour a concrete slab, I wondered why people kept saying it was so labor-intensive. Now I know.
We formed up the stair and poured the concrete right before Easter. I can’t think of a better way to spend Good Friday than slaving over concrete, can you? 😉
My incredible husband had the opportunity to play golf with his buddies that day but instead chose to help me with the concrete pour because he said, “I want to help my wife’s blog be successful.” Is that not the sweetest gesture ever?
Here’s my awesome dad working hard, too, helping Matt and I build the form for the stair:
This is what the form looked like when it was ready for concrete:
A concrete form is typically made from pieces of wood (2x6s, 2x4s, plywood, etc.) secured with nails or screws, steel pins and reinforcing bars (rebar). The purpose of a form is to create the shape – or mold – of what the finished slab of concrete will look like. Of course it also holds the concrete in place while it sets.
For a helpful step-by-step tutorial on how to pour a concrete slab, I like this one. I also used this calculator to determine how much concrete mix I needed for my project. I bought a few extra bags of mix (25 total bags to be exact; my pour called for about 20) and ended up using all but one. I would recommend getting a few extra bags to account for uneven subgrade, waste, etc. (Note: I didn’t use gravel in the bottom of our form because it was unnecessary for our particular project.)
Before pouring the concrete, I sprayed around the form with Spectracide Weed & Grass Killer to keep stuff from growing in the vicinity of the new concrete.

In final preparation for the concrete, we moistened the ground in the center of the form. (Spectracide is rain-fast in 15 minutes, so we didn’t worry too much about getting water on the outside of the form.)
Then we poured. We used my dad’s mixer to stir the concrete mix and water together, then we transferred the concrete via wheelbarrow to the form.
Here is the form completely filled with wet concrete:
As the concrete began to set, we used finishing tools to work with the slab to ensure the finished stair would be level, would shed water properly, and would look great. We were blessed that the rain held off for a few days!
Stay tuned for the final reveal of our finished stair. 🙂
In addition to pouring the stair, I finished refurbishing the outdoor ceiling fan/light fixture.

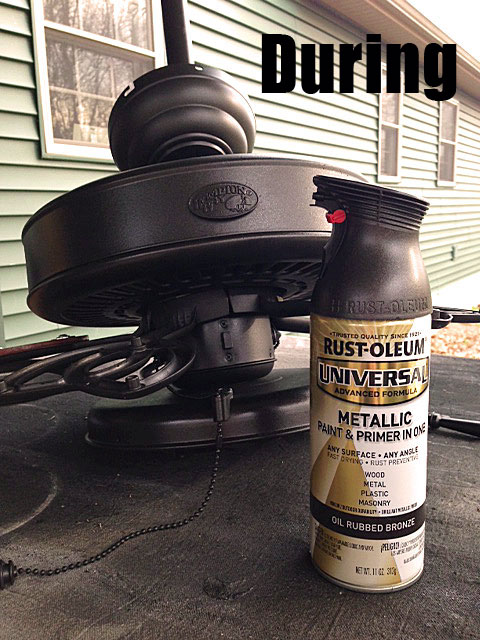


For all the details on that project, click here. I will admit I encountered a few hiccups along the way, including a maddening search for two missing fan blade screws and a sticky stain situation. But in the end, I think the fixture looks 10 times better than before, don’t you?
I also managed to DIY my own thrifty knockoff planters that mimic the look of the expensive, Tuscan-style version I saw at Lowe’s.
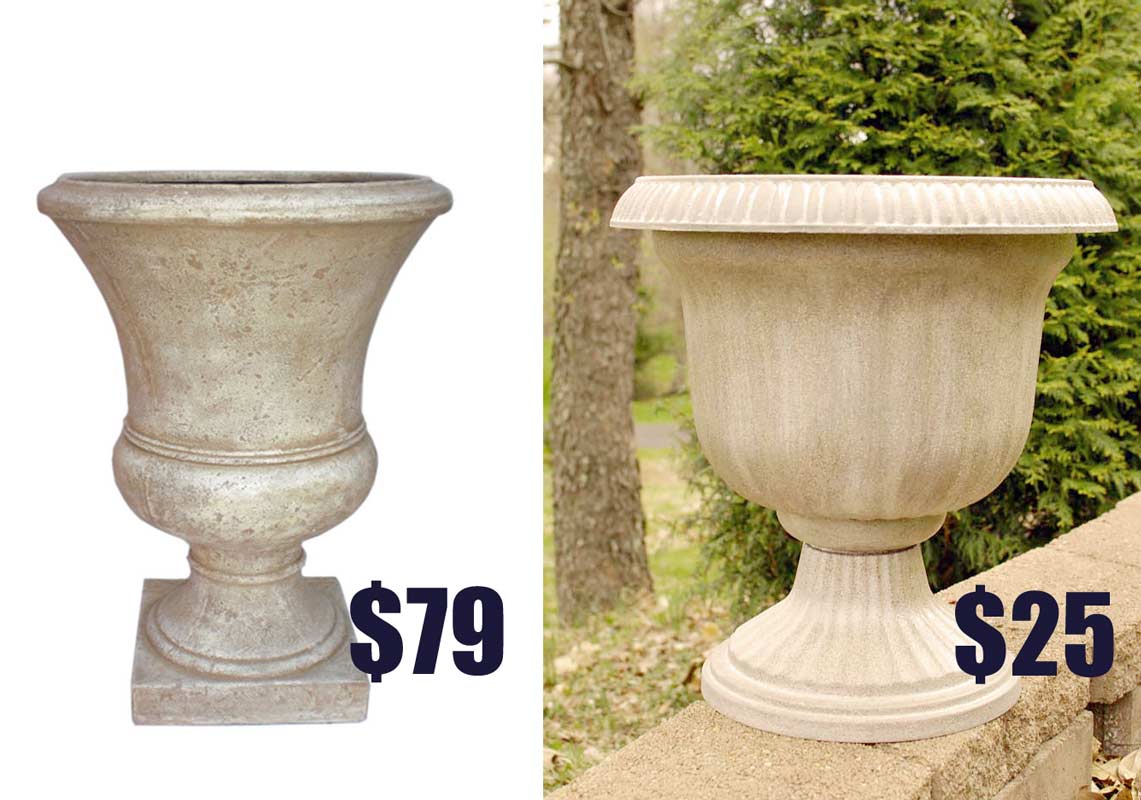
For details on how to do that project, click here.
My next project is to work on getting some plants for the new planters. Here are a few ideas I pinned to my Outdoor board on Pinterest:
Via Pinterest
Via Pinterest
Via Pinterest
Keep an eye out for the final reveal of my thrifty patio upgrade coming soon!
To all of my yard warriors, whether you are after a total yard overhaul or just want to keep your yard looking its best, visit the Spectracide Facebook page for tips and savings to get started.
This is a sponsored conversation written by me on behalf of Spectracide. The opinions and text are all mine.


You have a great husband AND father…he’s always helping. I like the shelf video you did with you dad. Anyway, I actually thought you bought a new fan and it’s amazing what a little spray paint can do, huh?! Can’t wait for the final version of this deck…it’s really going to be a great place to entertain or just read a book.
Thanks so much for the great feedback, Dawn, and for stopping by to see the progress! 🙂
We’ve done our own share of doing stairs, sidewalks, and concrete areas, but one thing I’ve done at the concrete area at the dog house was took the dogs paw and did two dog prints. That was 28 years ago. I don’t have that dog now and it is a nice memory. At my outdoor barn, I inscribed the date and my initials into the finished corner. That was cool and I know when I did this each time I see it. At my former church, the fellowship hall had a step landing. My dad poured the small step landing, and on it, he carved his initials. This is such a precious memory because he passed in 1993. Consider doing a memory in concrete. Maybe do the kids hand prints or the pets paws on a homemade garden stone for in a flower bed. I did this with two of my dogs and love it! Childrens’ hands grow up and is interesting to see these in a garden too. Precious memories! Great job!
We did hand prints of our littles when we poured concrete at my parents’ camp. Cute idea!